Cache
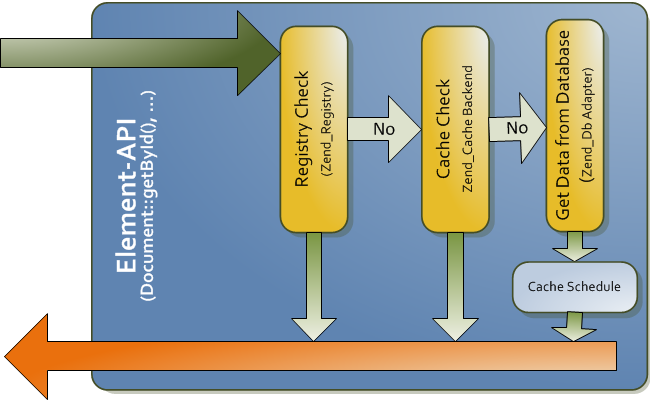
Pimcore uses extensively caches for differently types of data. The primary cache is a pure object cache where every element (document, asset, object) in Pimcore is cached as it is (serialized objects). Every cache item is tagged with dependencies so the system is able to evict dependent objects if a referenced object changes.
The second cache is the output cache, which you can use either as pure page cache (configurable in system settings), or as in-template cache (see more at view helpers).
The third cache is used for add-ons like the glossary, translations, database schemes, and so on. The behavior of the caches is controlled by the add-on itself.
All of the described caches are utilizing the Pimcore\Cache interface to store their objects. Pimcore\Cache utilizes
a Pimcore\Cache\Core\CoreHandlerInterface to apply Pimcore's caching logic on top of a PSR-6
cache implementation which needs to implement cache tagging.
By default, Pimcore ships with default cache pools (backends) for Doctrine and Redis, but you can implement custom
cache pools by implementing Pimcore\Cache\Pool\PimcoreCacheItemPoolInterface. See Custom Cache Pools
for details.
Configuring the cache
The PimcoreCoreBundle defines a default cache configuration which you can override in your config files:
# pimcore/lib/Pimcore/Bundle/CoreBundle/Resources/config/pimcore/config.yml

pimcore:
    cache:
        enabled:              true
        pool_service_id:      null
        default_lifetime:     2419200
        pools:
            doctrine:
                enabled:              true
                connection:           default
            redis:
                enabled:              false

                # Redis connection options. See Pimcore\Cache\Pool\Redis\ConnectionFactory
                connection:
                    server:               ~
                    port:                 6379
                    database:             0
                    password:             null
                    persistent:           ''
                    force_standalone:     false
                    connect_retries:      1
                    timeout:              2.5
                    read_timeout:         0

                # Redis cache pool options. See Pimcore\Cache\Pool\Redis
                options:
                    notMatchingTags:      ~
                    compress_tags:        ~
                    compress_data:        ~
                    compress_threshold:   ~
                    compression_lib:      ~
                    use_lua:              ~
                    lua_max_c_stack:      ~
By default, the cache will reuse the Doctrine connection and write to your DB's cache and cache_tags tables. You can override
the used connection by setting connection setting to a known Doctrine connection (see
DoctrineBundle Reference
for further information).
If you enable the redis cache configuration, the Redis cache will be used instead of the Doctrine one, even if Doctrine
is enabled as well.
IMPORTANT! It is crucial to test and verify your Redis configuration, if Pimcore is unable to connect to Redis, the entire system will stop working.
If you want to use a custom cache pool, ignore the pools section (or disable both predefined pools) and set the pool_service_id
entry to the service ID of your custom pool (needs to be defined as service on the service container). There are a couple
of cache pools predefined in cache.yml
but those (array, filesystem) are mainly used for testing.
If all of the predefined cache pools are disabled, the cache will fall back to a filesystem cache which is rather slow.
Recommended Redis Configuration (redis.conf)
# select an appropriate value for your data
maxmemory 768mb

# IMPORTANT! Other policies will cause random inconsistencies of your data!
maxmemory-policy volatile-lru
save ""
With the default settings, the minimum supported Redis version is 3.0.
Please note that the Redis adapter currently doesn't properly support Redis Cluster setups.
Element Cache Workflow (Asset, Document, Object)

Using the Cache for your Application
Use the Pimcore\Cache facade to interact with the core cache or directly use the pimcore.cache.core.handler service.
You can use this functionality for your own application, and also to control the behavior of the Pimcore cache (but be careful!).
If you don't need the transactional tagging functionality as used in the core you're free to use a custom cache system as provided by Symfony but be aware that custom caches are not integrated with Pimcore's cache clearing functionality.
Example of custom usage in an action
$lifetime = 99999;
$uri = "http://www.pimcore.org/...";
$cacheKey = md5($uri);
if(!$data = \Pimcore\Cache::load($cacheKey)) {

    $httpClient = \Pimcore\Tool::getHttpClient();
    $httpClient->setUri($uri);

    try {
        $response = $httpClient->request();

        if($response->isSuccessful()) {
            $data = $response->getBody();
            \Pimcore\Cache::save(
                $data,
                $cacheKey,
                ["output","tag1","tag2"],
                $lifetime);
        }
    } catch (Exception $e) {
        die("Something went wrong, ... sorry");
    }
}
Overview of functionalities
// disable the cache globally
\Pimcore\Cache::disable();

// enable the cache globally
\Pimcore\Cache::enable();

// invalidate caches using a tag
\Pimcore\Cache::clearTag("mytag");

// invalidate caches using tags
\Pimcore\Cache::clearTags(["mytag","output"]);

// clear the whole cache
\Pimcore\Cache::clearAll();

// disable the queue and limit and write immediately
\Pimcore\Cache::setForceImmediateWrite(true);
Disable the Cache for a Single Request
Sometimes it's useful to deactivate the cache for testing purposes for a single request. You
can do this by passing the URL parameter nocache=true. Note: This is only possible if you have
enabled the DEBUG MODE in Settings > System
For example: http://www.pimcore.org/download?nocache=true
This will disable the entire cache, not only the output-cache. To disable only the output-cache
you can add this URL parameter: ?pimcore_outputfilters_disabled=true
Here you can find more magic parameters.
If you want to disable the cache in your code, you can use:
\Pimcore\Cache::disable();
This will disable the entire cache, not only the output-cache. WARNING: Do not use this in production code!
It is also possible to just disable the output-cache in your code, read more here.
Further Reading
- Setup a custom caching-backend - see Custom Cache Pools.
- Details about output-cache - see Output Cache.