Create Your Own Bricks
Architecture of a Brick
A brick is an instance of Pimcore\Extension\Document\Areabrick\AreabrickInterface which can either be auto-loaded
by saving the brick to a special namespace inside your bundle or by defining the brick as a service and adding it to the
list of available bricks through a DI tag. The brick class is the only mandatory file for a brick, however most bricks
will at least implement a view template which is rendered in frontend and editmode.
The templates itself are normal templates which are passed to the rendering engine. Therefore you can use all existing templating helpers and Pimcore editables.
Brick registration
A brick will be registered on the system and is represented by a brick ID which has to be unique throughout the
system. If a brick ID is registered twice (e.g. by multiple bundles), an error will be raised. The simple way to
register a brick is to just save it to a special namespace Document\Areabrick inside your bundle. Every bundle will
be scanned for classes implementing AreabrickInterface and all found bricks will be automatically registered to
the system. The brick ID will be built from the class name of the implementing class by converting the class name to
dashed case. For example a brick named MyCustomAreaBrick will be automatically registered as my-custom-area-brick.
A basic brick implementation could look like the following. As it is defined in the special namespace, Pimcore will
implicitely auto-create a service app.area.brick.iframe and register it on the areabrick manager with the ID iframe.
<?php

namespace AppBundle\Document\Areabrick;

use Pimcore\Extension\Document\Areabrick\AreabrickInterface;

class Iframe implements AreabrickInterface
{
    // implementing class methods
}
Please note that you need to clear the cache after you added a brick to the special namespace.
If you need more control over the brick instance (e.g. because your brick has dependencies on other services or you
want to specify the brick ID manually), you can add the service definition yourself and tag the service with the DI
tag pimcore.area.brick. Bricks defined manually will be excluded from the auto-registration, even if they're
defined in the special namespace. Let's define our brick as above, but assume it needs access to a logger instance:
# a service.yml file defining services
services:
    AppBundle\Document\Areabrick\Iframe:
        arguments: ['@logger']
        tags:
            - { name: pimcore.area.brick, id: iframe }
This will register the brick as above, but you have control over the brick ID and are able to make use of the container for dependencies.
Although it might be tempting to overwrite the
getId()method in your bricks, please make sure the brick always refers to the ID which is set viasetId($id)when the brick is registered. OverridinggetId()won't affect the brick ID as it is registered on the system as bricks are lazy-loaded. The areabrick manager will set the registered ID when the brick instance is fetched.
Brick template auto discovery
For convenience, you can create a new brick by extending Pimcore\Extension\Document\Areabrick\AbstractTemplateAreabrick
to make use of template auto-discovery (thus, needing a minimum of code to get started). The template area brick
implements the TemplateAreabrickInterface which defines the following methods you can use to control template
auto-discovery. Please make sure your brick is defined inside a bundle as otherwise your templates can't be
auto-discovered.
interface TemplateAreabrickInterface extends AreabrickInterface
{
    const TEMPLATE_LOCATION_GLOBAL = 'global';
    const TEMPLATE_LOCATION_BUNDLE = 'bundle';

    const TEMPLATE_SUFFIX_PHP  = 'html.php';
    const TEMPLATE_SUFFIX_TWIG = 'html.twig';

    /**
     * Determines if template should be auto-located in area bundle or in app/Resources
     *
     * @return string
     */
    public function getTemplateLocation();

    /**
     * Returns view suffix used to auto-build view names
     *
     * @return string
     */
    public function getTemplateSuffix();
}
The template location defines the base path which will be used to find your templates. It resolves to the following
locations. <bundlePath> is the filesystem path of the bundle the brick resides in, <brickId> the ID of the brick
as registered on the areabrick manager (see below).
| Location | Path |
|---|---|
| global | app/Resources/views/Areas/<brickId> |
| bundle | <bundlePath>/Resources/views/Areas/<brickId> |
Depending on the template location, the following files will be used. You can always completely control locations by
implementing the methods for templates and icon yourself (see AreabrickInterface):
| Type | Location | |
|---|---|---|
| view template | <templateLocation>/view.<suffix> |
|
| edit template | <templateLocation>/edit.<suffix> |
If the brick defines an icon in the public resources directory of the bundle, the icon will be automatically used
in editmode. If the icon is at another location, you can override the getIcon() method and specify an URL to be
included as icon. When rendering editmode, the following location will be searched for the brick icon and is expected
to be a 16x16 pixel PNG: <bundlePath>/Resources/public/areas/<brickId>/icon.png which resolves to the URL
/bundles/<bundleUrl>/areas/<brickId>/icon.png when included in editmode.
Given our iframe brick defined before, the following paths will be used.
global template location
| Location | Path |
|---|---|
| view template | app/Resources/views/Areas/iframe/view.html.(php|twig) |
| edit template | app/Resources/views/Areas/iframe/edit.html.(php|twig) |
| icon path | web/bundles/app/areas/iframe/icon.png |
| icon URL | /bundles/app/areas/iframe/icon.png |
bundle template location
The icon path and URL are the same as above, but the view scripts are expected inside the bundle.
| Location | Path |
|---|---|
| view template | src/AppBundle/Resources/views/Areas/iframe/view.html.(php|twig) |
| edit template | src/AppBundle/Resources/views/Areas/iframe/edit.html.(php|twig) |
How to Create a Brick
Let's suppose, that our iframe brick defined above is responsible for generating an <iframe> containing contents
from a specified URL in the editmode. First of all, let's update the class to add metadata for the extension manager, to
make use of template auto-discovery and to load the view template from app/Resources/views instead of the bundle
directory:
<?php
// src/AppBundle/Document/Areabrick/Iframe.php

namespace AppBundle\Document\Areabrick;

use Pimcore\Extension\Document\Areabrick\AbstractTemplateAreabrick;

class Iframe extends AbstractTemplateAreabrick
{
    public function getName()
    {
        return 'IFrame';
    }

    public function getDescription()
    {
        return 'Embed contents from other URL (websites) via iframe';
    }

    public function getTemplateLocation()
    {
        return static::TEMPLATE_LOCATION_GLOBAL;
    }
}
Let's create a view as next step. Views behave exactly as native controller views and you have access to the current
document, to editmode and to editables and templating helpers as everywhere else. In addition there's a instance
variable on the view which gives you access to the brick instance. A info variable (see below) gives you access to
brick metadata. Our view is rendered through the PHP engine and has a suffix of .html.php however you're free to
use Twig or other templating engines as you wish.
<?php // app/Resources/views/Areas/iframe/view.html.php ?>
<?php if ($this->editmode): ?>
    <div>
        <h2>IFrame</h2>
        <div>
            URL: <?= $this->input("iframe_url"); ?>
        </div>
        <br/>
        <b>Advanced Configuration</b>
        <div>
            Width: <?= $this->numeric("iframe_width"); ?>px (default: 100%)
        </div>
        <div>
            Height: <?= $this->numeric("iframe_height"); ?>px (default: 400px)
        </div>
        <div>
            Transparent: <?= $this->checkbox("iframe_transparent"); ?> (default: false)
        </div>
    </div>
<?php else: ?>
    <?php if (!$this->input("iframe_url")->isEmpty()): ?>

        <?php
        // defaults
        $transparent = "false";
        $width       = "100%";
        $height      = "400";

        if (!$this->numeric("iframe_width")->isEmpty()) {
            $width = (string)$this->numeric("iframe_width");
        }
        if (!$this->numeric("iframe_height")->isEmpty()) {
            $height = (string)$this->numeric("iframe_height");
        }
        if ($this->checkbox("iframe_transparent")->isChecked()) {
            $transparent = "true";
        }
        ?>

        <iframe src="<?= $this->input("iframe_url"); ?>" width="<?= $width; ?>" height="<?= $height; ?>" allowtransparency="<?= $transparent; ?>" frameborder="0"></iframe>

    <?php endif; ?>
<?php endif; ?>
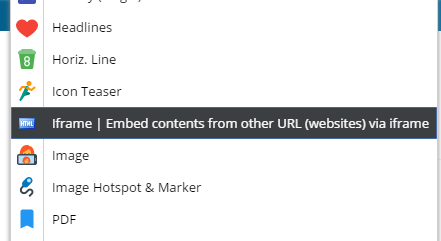
Now you should be able to see your brick in the list of available bricks on your areablock:
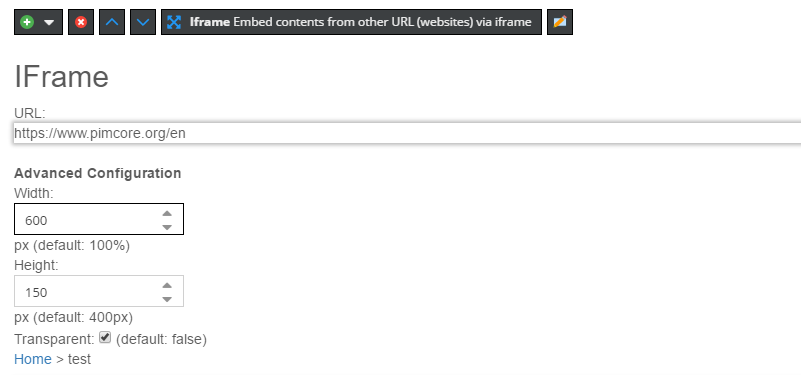
In editmode you can see the configuration for the Iframe brick:
The Brick info-object
Brick views and methods will have access to an Info object containing metadata about the current brick. It is
exposed as info variable on views and passed to brick methods as argument. Many methods exist for historical
reasons, but a couple of methods could be useful when implementing your own bricks.
| Method | Description |
|---|---|
$info->getTag() |
Returns the tag rendering the brick |
$info->getRequest() |
Returns the current request |
$info->getView() |
Returns the ViewModel to be rendered |
$info->getIndex() |
Returns the current index inside the areablock |
$info->getParam($name) |
Retrieve a param passed by globalParams or params config option |
$info->getParams() |
Retrieve all params passed by globalParams or params config option |
Configuration in Editmode
You can use the edit template to allow users to add data to the brick. The edit template file can include HTML and editables. When this file is present an icon will appear for the user which can be clicked to display and edit the editable fields.
To configure your brick to use an edit template, the brick must be configured to have an edit template. The edit template will be resolved the same way as the view template.
<?php

namespace AppBundle\Document\Areabrick;

use Pimcore\Extension\Document\Areabrick\AbstractTemplateAreabrick;

class Iframe extends AbstractTemplateAreabrick
{
    // other methods defined above

    public function hasEditTemplate()
    {
        return true;
    }
}
Using an edit template will disable all editables in the view template in editmode (they appear like in the frontend, but cannot be edited).
Example contents of an edit template (e.g. edit.html.php):
Class: <?= $this->input('class'); ?>
Accessing the data in the view template:
<?php
    $class = '';
    if(!$this->input('class')->isEmpty()) {
        $class = $this->input('class')->getData();
    }
?>
Methods on the brick class
Sometimes a brick is more than just a view-script and contains some functionality which shouldn't be directly in the view.
In this case you can use the action() and postRenderAction() method on the brick class which both get the info
object as parameter. The action() method is no real controller action, it is just a little helper to get some logic
and code out of the
view. However, you can use the action method to prepare data for the view (for example parse request params).
Since Pimcore 5.0.3 you can return a Response object from action() and postRenderAction() and this response
will be sent back to the client.
If you need to influence the HTML open and close tag, you can do so by customizing getHtmlTagOpen() and
getHtmlTagClose() (see example below).
<?php

namespace AppBundle\Document\Areabrick;

use Pimcore\Extension\Document\Areabrick\AbstractTemplateAreabrick;
use Pimcore\Model\Document\Tag\Area\Info;
use Symfony\Component\HttpFoundation\RedirectResponse;

class Iframe extends AbstractTemplateAreabrick
{
    // other methods defined above
    //
    public function action(Info $info)
    {
        $myVar = $info->getRequest()->get('myParam');

        $info->getView()->myVar = $myVar;

        // optionally return a response object
        if ('POST' === $info->getRequest()->getMethod()) {
            return new RedirectResponse('/foo');
        }
    }

    // OPTIONAL METHODS

    // executed after a brick is rendered
    public function postRenderAction(Info $info)
    {
    }

    // returns a custom html wrapper element (return an empty string if you don't want a wrapper element)
    public function getHtmlTagOpen(Info $info)
    {
        return '<span class="customWrapperDiv">';
    }

    public function getHtmlTagClose(Info $info)
    {
        return '</span>';
    }
}
Migration from Pimcore 4 bricks
Migration of existing bricks should be quite straightforward if you don't switch the templating engine. The following steps should get you started:
- Create a brick class which contains the data you need from the
area.xmlfile and make sure theIDof the new brick matches the<id></id>attribute fromarea.xmleither by naming your class accordingly or by registering the service manually. - Move the view scripts and an optional icon from
website/views/areasto their new location (see above). Depending on the complexity of your view scripts you might need to adapt them to the new templating engine (see MVC docs). Please note that the extension for PHP templating view scripts changed from.phpto.html.php.
Bricks defined this way are only valid for views rendered through the Symfony stack. If you need bricks to work in the compatibility they still need to be implemented the Pimcore 4 way in
website/views.
Examples
You can find many examples in the demo / quick start package.